
Getting better sound from a Jeep Grand Cherokee starts with the controls already in the vehicle, not with a universal “magic” equalizer preset. Begin with a flat EQ, centered balance and fade, clean source audio, and low or medium speed-adjusted volume. Then make small changes while parked. Before buying speakers or an amplifier, confirm the model year, two-row or Grand Cherokee L body style, trim, factory audio package, and VIN because wiring, speaker locations, impedance, and amplification vary.
Quick Answer
For most Jeep Grand Cherokees, start with bass, midrange, and treble at zero; keep balance and fade centered; set speed-adjusted volume to 1 or 2; and leave surround off for a focused stereo image. Raise or cut one band at a time, then verify the result on familiar music at city and highway speeds.
Key Takeaways
- Start flat. Large bass or treble boosts often create distortion before they create better sound.
- Uconnect settings vary by radio and trim, but current Uconnect 5 systems can include balance/fade, equalizer, speed-adjusted volume, and surround sound when equipped.
- Time alignment is an aftermarket DSP feature unless it is built into the specific factory or add-on processor; it is not a normal user adjustment in the standard Uconnect 5 audio menu.
- Match amplifier RMS output to the speaker’s continuous power rating at the actual impedance, then set gain with test tones or clipping detection—not by knob position.
- Verify speaker fitment by VIN and factory audio package before ordering. “Grand Cherokee” alone is not enough to guarantee compatibility.
At a Glance
| Time Required | 20–45 minutes for factory-setting adjustments; 2–6 hours for a typical speaker or amplifier installation |
| Difficulty | Easy for Uconnect tuning; moderate to advanced for amplified factory systems and DSP integration |
| Tools Needed | Familiar test tracks, owner/radio manual, tape measure for manual DSP setup, and manufacturer-approved test tones plus a meter, oscilloscope, or clipping indicator for amplifier gain |
| Cost | $0 for tuning; roughly $100–$1,000+ for speakers, integration hardware, amplification, DSP, wiring, and professional labor |
Affiliate disclosure: This article contains Amazon affiliate links. If you buy through them, we may earn a commission at no extra cost to you. Product fitment can vary by model year, body style, trim, factory amplifier, and speaker package, so confirm compatibility with your VIN before ordering.
Best Baseline Audio Settings for Jeep Grand Cherokee
The best starting point is neutral. The 2026 Uconnect 5 radio manual lists balance/fade, equalizer, speed-adjusted volume, and surround sound when equipped. Older Uconnect versions may place these controls in a different menu or provide a different adjustment range.
| Control | Starting Setting | How to Fine-Tune It |
|---|---|---|
| Bass | 0 | Try +1 only if bass is thin. Reduce it if door panels rattle or kick drums sound swollen. |
| Midrange | 0 | Use a small boost for clearer vocals or a small cut if voices sound nasal or crowded. |
| Treble | 0 | Try +1 for extra detail. Reduce it if cymbals, “S” sounds, or navigation prompts become sharp. |
| Balance/Fade | Centered | Move the fade one step forward only when rear speakers pull vocals behind the driver. |
| Speed-Adjusted Volume | 1 or 2 | Use 0 on quiet roads. Use 3 only if the automatic increase does not feel distracting. |
| Surround Sound | Off for initial tuning | Turn it on later if you prefer wider multi-seat sound. Leave it off when it makes vocals vague or phasey. |
A small cut at the problem frequency usually sounds cleaner than a large boost somewhere else. Start flat, change one control, and compare at the same volume.
Optional Speaker Upgrade Picks for Jeep Grand Cherokee
These kits may help when factory speakers are damaged or lack clarity, but none is a universal fit. Grand Cherokee generations and audio packages use different wiring, amplifiers, crossovers, and speaker locations. Confirm the exact application before buying, especially on Alpine, Harman Kardon, and McIntosh systems.
| KICKER 6×9″ Jeep Grand Cherokee Speaker Upgrade Kit | 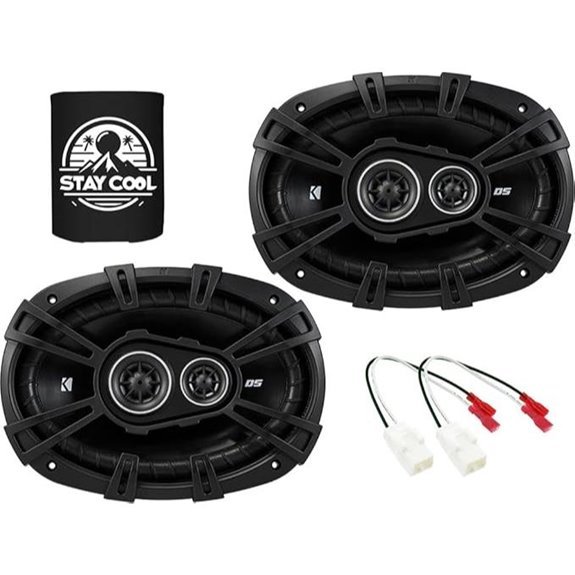 |
Easiest Install | Vehicle Compatibility: Seller-listed for Jeep Grand Cherokee 2014-2020; verify VIN and audio package | Speaker Size: 6×9 inch | Speaker Type: 3-way coaxial | VIEW LATEST PRICE | Read Our Analysis |
| Harmony Audio Kicker Speaker Bundle for Jeep Grand Cherokee | 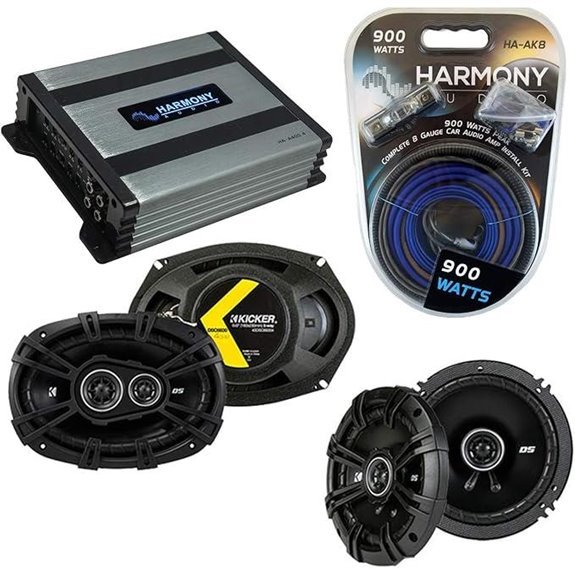 |
Complete Bundle | Vehicle Compatibility: Seller-listed for Jeep Grand Cherokee 2005-2013; verify generation, trim, and factory amplifier | Speaker Size: 6×9 inch and 6.5 inch | Speaker Type: Coaxial (3-way 6×9, 2-way 6.5) | VIEW LATEST PRICE | Read Our Analysis |
| Harmony Audio Speaker and Amp Kit for Jeep Grand Cherokee | 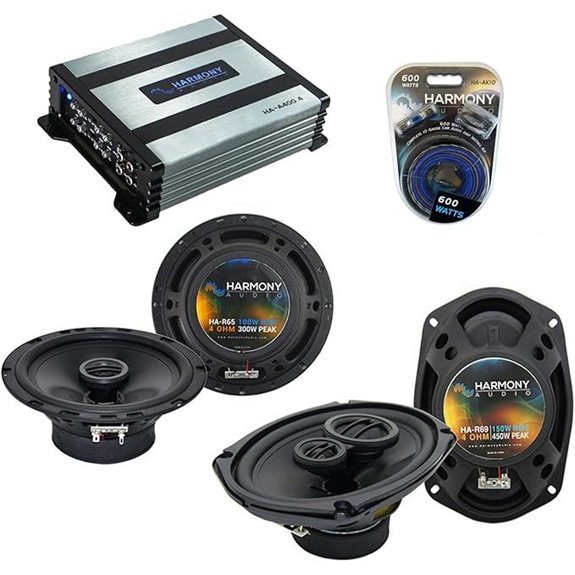 |
Most Powerful | Vehicle Compatibility: Seller-listed for Jeep Grand Cherokee 2005-2013; verify VIN and factory audio system | Speaker Size: 6×9 inch and 6.5 inch | Speaker Type: 3-way and 2-way | VIEW LATEST PRICE | Read Our Analysis |
More Details on Our Top Picks
-
KICKER 6×9″ Jeep Grand Cherokee Speaker Upgrade Kit
If factory speakers sound muddy or brittle, this kit offers a convenient way to install KICKER DS Series 6×9-inch coaxials in seller-listed 2014-2020 applications. The included Vixen Go harness is intended to reduce wire cutting, but connector shape, mounting depth, factory amplification, and door location still need to be checked before installation.
KICKER lists the DSC6930 as a 4-ohm, 3-way speaker with 360 watts peak power, 90 watts recommended RMS power, 92 dB sensitivity, and a 30 Hz–20 kHz frequency response. Those are driver specifications, not a promise that every Grand Cherokee door will reproduce 30 Hz cleanly. The polypropylene cone and zero-protrusion tweeter support a flush installation, while factory radio and steering-wheel controls should continue to operate when the correct harness and integration method are used. These are automotive speakers, not waterproof marine speakers, and warranty coverage depends on the seller and whether the product came from an authorized source.
- Vehicle Compatibility:Seller-listed for Jeep Grand Cherokee 2014-2020; verify VIN and factory audio package
- Speaker Size:6×9 inch
- Speaker Type:3-way coaxial
- Amplifier Included:No
- Install Kit Included:Yes (Vixen Go speaker harness)
- Connectivity:Wired
- Additional Feature:Plug-and-play-style installation when the supplied connectors match
- Additional Feature:Zero-protrusion tweeter
- Additional Feature:Vixen Go harness included
-
Harmony Audio Kicker Speaker Bundle for Jeep Grand Cherokee
This bundle combines 6×9-inch and 6.5-inch coaxial speakers, a Harmony Audio HA-A400.4 Class D amplifier, an RCA adapter, and an 8-gauge installation kit. It can simplify parts shopping for seller-listed 2005-2013 vehicles, but that year range crosses major Grand Cherokee generations and several factory audio systems. Treat the listing as a starting point, not final fitment proof.
The listing advertises the amplifier at 75 watts RMS per channel at 4 ohms. Confirm the exact KICKER speaker model supplied with the current bundle because model revisions can change continuous power handling. Four-channel mode is normally the simplest way to maintain front and rear control. Bridged operation changes channel count, required impedance, crossover needs, and available power, so use it only when the amplifier manual and speaker load allow it.
The included wire kit does not guarantee correct electrical capacity by itself. Choose cable size, fuse value, ground point, and routing from the amplifier’s actual current draw, cable length, and manufacturer instructions. Factory-amplified vehicles may also need a load-generating interface, signal summing, or DSP rather than a basic RCA adapter.
- Vehicle Compatibility:Seller-listed for Jeep Grand Cherokee 2005-2013; verify generation, trim, and factory amplifier
- Speaker Size:6×9 inch and 6.5 inch
- Speaker Type:Coaxial (3-way 6×9, 2-way 6.5)
- Amplifier Included:Yes (4-channel Class D)
- Install Kit Included:Yes (advertised 8-gauge kit)
- Connectivity:Wired
- Additional Feature:HA-EASY RCA adapter
- Additional Feature:8-gauge wire kit
- Additional Feature:Class D amplifier
-
Harmony Audio Speaker and Amp Kit for Jeep Grand Cherokee
This seller-listed 2005-2013 package combines HA-R69 6×9-inch speakers, HA-R65 6.5-inch speakers, a HA-A400.4 amplifier, and a 10-gauge installation kit. The listing describes the speakers at 150 watts RMS and 100 watts RMS and the amplifier at 75 watts RMS per channel at 4 ohms. Confirm those ratings on the current product and amplifier documentation because the “800-watt” label is a maximum marketing figure, not four-channel continuous output.
Do not set the gain knob to 75%. Gain is an input-sensitivity match, not a volume percentage. Start with amplifier gain at minimum, set the source and EQ as directed by the amplifier maker, play the specified test tone, and raise gain only to the target voltage or clean-output limit. KICKER’s gain-setting guidance and test tones use this method.
A high-pass filter around 80 Hz can be a reasonable first test for many 6.5-inch door speakers, while some 6×9-inch speakers may tolerate a lower setting. These are not universal numbers. Raise the crossover if the speaker distorts or the door panel rattles. Keep bass boost at 0 dB during setup, and aim tweeters carefully because direct high-frequency output can become harsh at the driver’s seat.
- Vehicle Compatibility:Seller-listed for Jeep Grand Cherokee 2005-2013; verify VIN and factory audio system
- Speaker Size:6×9 inch and 6.5 inch
- Speaker Type:3-way and 2-way
- Amplifier Included:Yes (advertised 800W maximum; listing states 75W x 4 RMS at 4 ohms)
- Install Kit Included:Yes (advertised 10-gauge 600W kit)
- Connectivity:Wired
- Additional Feature:10-gauge installation kit
- Additional Feature:Advertised 95 dB signal-to-noise ratio
- Additional Feature:1-inch tweeter size
How to Tune Jeep Grand Cherokee Audio Settings Step by Step
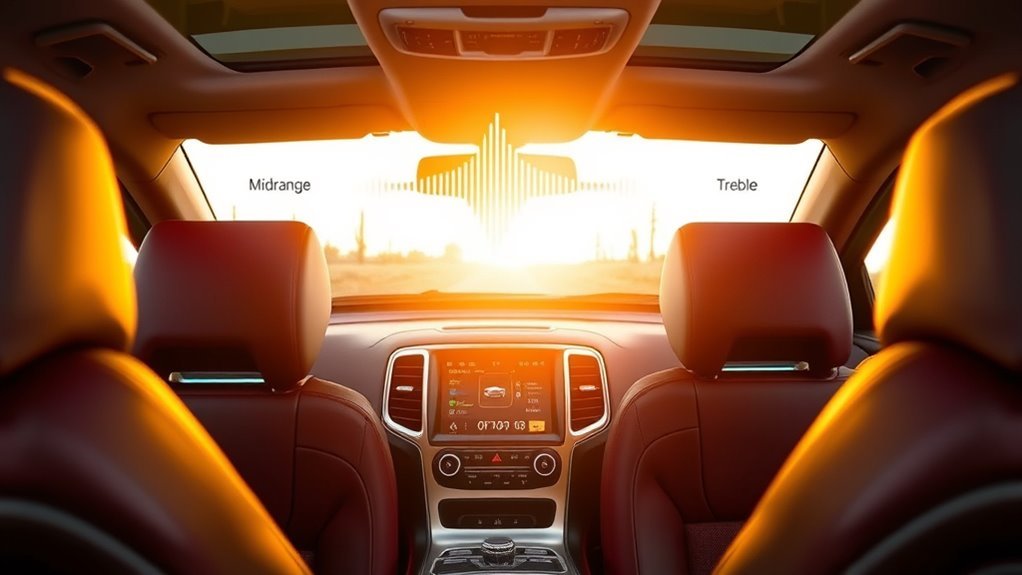
1. Verify the Model Year and Factory Audio System
Identify whether the vehicle is a two-row Grand Cherokee, a three-row Grand Cherokee L, or a 4xe. Then confirm the radio and audio package from the build sheet, window sticker, owner information, or VIN lookup. A standard six-speaker system, an Alpine system, a Harman Kardon system, and the available 2026 McIntosh system with 19 speakers, a 17-channel amplifier, and a 10-inch subwoofer cannot be tuned or upgraded as though they use the same wiring.
2. Reset Tone Controls Before Listening
Set bass, midrange, and treble to 0. Center balance and fade. Turn surround sound off and set speed-adjusted volume to 0 for the first parked test. Disable phone EQ, loudness, and sound-check features when possible so you are not stacking one equalizer on top of another.
3. Use Familiar, Well-Recorded Test Tracks
Use several songs you know well: one with a natural vocal, one with tight bass and kick drum, one with cymbals or acoustic guitar, and one dense track that can reveal congestion. Keep the same source, app quality setting, and playback level while comparing changes.
4. Set Balance and Fade
Start centered. A centered vocal should appear near the middle of the dashboard, not from one door. If the rear speakers pull the image backward, move fade forward one step. Avoid large balance corrections unless you are compensating for a known hearing difference or diagnosing a weak channel.
5. Adjust Bass, Midrange, and Treble One Step at a Time
Raise or lower only one band, then replay the same part of the track. Stop when the change solves a clear problem. Bass boost cannot replace a subwoofer, and large treble boosts cannot restore detail lost through a weak source or damaged speaker.
6. Add Speed-Adjusted Volume
After parked tuning, set speed-adjusted volume to 1 and drive on a familiar road. Move to 2 if music disappears under tire and wind noise. This feature raises playback level as speed increases; it does not reduce road noise. Level 3 can be useful in a noisy vehicle but may sound like the volume is changing too aggressively.
7. Compare Surround Sound On and Off
Surround can create broader coverage for several passengers, but it can also soften center vocals or change phase relationships. Tune with it off first. Turn it on only after the basic EQ and balance are stable, then keep the version that sounds more natural across several tracks.
8. Configure Time Alignment Only When a DSP Provides It
Factory Uconnect 5 menus do not normally expose manual time alignment. With an aftermarket DSP, measure from the listening position to each speaker or follow the processor’s microphone procedure. A DSP delays the closer speakers so their sound reaches the listener with the farther speakers. Products such as the KICKER KEY200.4 can automate EQ, level, crossover, and time-alignment setup.
9. Set Amplifier Gain and Crossovers Correctly
Match amplifier continuous output to the speakers’ RMS handling at the connected impedance. Set gains with the amplifier maker’s tone and procedure, a clipping indicator, an oscilloscope, or the calculated target AC voltage. Start with bass boost off. Set high-pass filters high enough to prevent door-speaker distress, then lower them only if the speakers remain clean at the loudest intended listening level.
10. Road-Test the Final Settings
Listen at city and highway speed with windows closed. Check quiet and loud passages, navigation prompts, phone calls, and several seating positions. Save the settings to the driver profile when that feature is available. Revisit the tune after a week instead of making large changes during one session.
Warning: Park before changing detailed audio settings. For hardware work, follow the vehicle and amplifier manuals, disconnect power only by the approved procedure, fuse the amplifier power lead as specified by its manufacturer, and avoid yellow airbag wiring and orange high-voltage cables. On a Grand Cherokee 4xe, never probe, move, or splice high-voltage wiring. Keep listening levels reasonable; NIOSH identifies repeated exposure around 85 dBA over an eight-hour day as a hearing-risk threshold.
Factors to Consider When Choosing Audio Settings for Jeep Grand Cherokee
The cabin, speaker system, amplifier, listening position, and source all affect the result. A setting that improves a standard two-row system may make an amplified Grand Cherokee L or McIntosh system worse.
Vehicle Acoustic Environment
Glass, seats, cargo, floor coverings, and speaker placement reflect or absorb different frequencies. Leather alone does not dictate the tune, but a mostly empty cabin often sounds brighter and more reflective than one filled with passengers and cargo. Tune from the driver’s seat first, then check the other seats.
Road noise changes with tires, pavement, speed, roof racks, and weather. Use speed-adjusted volume to compensate modestly. Treat loose trim and door rattles before adding bass. Sound-deadening material can help when installed correctly, but it must not block door drains, window tracks, side-impact sensors, wiring, or airbag deployment paths.
Speaker Configuration Options
Verify size, depth, connector, bolt pattern, impedance, and factory crossover behavior for the exact vehicle. A 3-way coaxial is not automatically better than a well-designed 2-way speaker; installation quality, off-axis response, sensitivity, and integration matter more than driver count.
Do not assume every Grand Cherokee speaker is 4 ohms. Factory amplified systems can use unusual impedances, active crossovers, equalization, signal delay, and load detection. Replacing one driver without measuring or checking an application guide can reduce output, trigger errors, or unbalance the system.
Amplifier Power Matching
Compare RMS output and RMS speaker handling at the same impedance. Peak or “maximum” numbers are not useful for matching daily power. An amplifier rated near the speaker’s continuous handling can work well, but there is no universal 75–100-watt target for every Grand Cherokee speaker.
An underpowered amplifier is not automatically safe if it is driven into clipping, and a higher-powered amplifier is not automatically dangerous when gain, crossover, and volume are controlled. Also verify charging-system capacity, wiring gauge, fuse value, grounding, heat management, and integration with factory warning tones and hands-free audio.
Listening Position Calibration
The driver sits closer to the left speakers than the right speakers, which can pull the stereo image toward the door. Balance/fade can make a broad correction. A DSP can make a more precise correction through channel level and time delay.
For manual DSP tuning, use the processor’s distance or delay method rather than copying settings from another vehicle. Speaker sensitivity figures such as 92 dB describe standardized output efficiency; they do not tell you where to set the volume or predict distortion in the installed door.
Source Material Quality
Low-bitrate files can sound smeared or harsh, but recording and mastering quality often matter more than the “hi-res” label. FLAC is a lossless format, not a compressed-lossy format. Direct USB file compatibility can vary by Uconnect radio and software version, so check the manual for the exact system.
Apple states that Apple Music lossless audio is available through CarPlay with a USB connection. Wireless CarPlay uses both Bluetooth and Wi-Fi for connection functions, so it should not be described as ordinary Bluetooth audio. Apple does not make the same lossless guarantee for wireless CarPlay. For consistent quality, use a reliable USB cable, enable the streaming app’s highest practical quality, and download tracks before driving where cellular coverage is weak.
Pro Tip: Build two listening references: a parked “flat” preset and a highway check using speed-adjusted volume. Do not create a highway EQ by heavily boosting bass and treble; that can increase clipping and listening fatigue without removing tire or wind noise.
How to Reduce Road Noise for Clearer Sound
- Fix rattles first: Tighten loose trim and use proper foam or tape at contact points instead of covering the problem with more bass.
- Inspect seals: Replace damaged door, hatch, or window weatherstripping with the correct vehicle part. Do not add material that prevents a door or liftgate from latching correctly.
- Choose quieter tires: Compare published tire-noise information and owner feedback while keeping the correct load rating, size, and seasonal performance.
- Use sound treatment carefully: Add constrained-layer damping and absorptive material only where it will not trap water, interfere with mechanisms, or cover safety components.
- Use speed-adjusted volume: Start at 1 or 2 rather than continually raising the master volume by hand.
Retrofitting acoustic glass is rarely a simple audio upgrade, and “noise-canceling tires” is not a standard product category. The realistic goal is to reduce rattles and broadband noise enough that the system sounds clear at a safer volume.
Jeep Grand Cherokee Audio Troubleshooting
| Symptom | Likely Checks |
|---|---|
| Muddy or boomy bass | Return bass to 0, check speaker polarity, raise the door-speaker high-pass filter, and stop panel rattles. |
| Thin bass | Check for a reversed speaker, excessive high-pass filtering, a failed factory woofer, or a source/app EQ cut. |
| Harsh treble | Reduce treble, turn surround off, check tweeter aim, and compare a better-mastered source. |
| Distortion at higher volume | Flatten EQ, reduce source or amplifier clipping, verify impedance, inspect damaged speakers, and confirm adequate voltage and wiring. |
| Hiss or alternator whine | Check grounds, gain, signal routing, RCA condition, charging-system faults, and factory-integration hardware. |
| Missing warning chimes or phone audio | Stop using the system until the interface and channel routing are corrected; these functions may share factory audio paths. |
When to Use a Professional Installer
Professional integration is the safer choice when the vehicle has a premium factory amplifier, active noise management, many speaker channels, a 4xe high-voltage system, load-sensing outputs, factory time alignment, or retained warning tones. A qualified installer can test the factory signal, choose the correct interface, protect the electrical system, and tune the DSP with measurement tools instead of guessing.
Sources
- 2026 Uconnect Radio Instruction Manual — backs up available Uconnect 5 audio controls and wired/wireless CarPlay operation.
- Jeep Grand Cherokee Technology — backs up current factory McIntosh system specifications.
- KICKER DSC6930 Specifications — backs up the 6×9-inch speaker’s impedance, power, sensitivity, and frequency-response figures.
- KICKER Amplifier Gain-Setting Test Tones — backs up the correct input-gain setup method.
- Apple Support: Lossless Audio in Apple Music — confirms lossless CarPlay playback through USB.
- Federal Trade Commission: Auto Warranties and Service Contracts — explains how aftermarket parts affect warranty coverage.
Frequently Asked Questions
Does Uconnect 5 support lossless audio formats?
There is no single universal Uconnect 5 codec answer for every radio and software version. FLAC itself is lossless, but direct USB-file support should be checked in the manual for the exact unit. Apple officially supports Apple Music lossless through CarPlay when the iPhone is connected by USB.
Can I install a subwoofer without removing third-row seats?
Yes, on a three-row Grand Cherokee L, compact powered subwoofers or vehicle-specific side-cargo enclosures may preserve the third row. Under-seat and spare-tire-well space is not guaranteed because modules, batteries, seat travel, and the spare-tire layout vary. A two-row Grand Cherokee does not have a third-row seat, so use a two-row-specific enclosure plan.
Will premium audio equipment void my Jeep warranty?
Aftermarket equipment does not automatically cancel the entire vehicle warranty. The FTC says a warranty generally remains in effect when aftermarket parts are used, but a manufacturer may deny coverage for damage caused by the part or installation. Keep receipts, use reversible integration where practical, and avoid modifying safety, data-bus, or high-voltage circuits.
How can I reduce road noise for better sound?
Fix loose trim, replace damaged weather seals, choose appropriately rated quieter tires, and add sound treatment without blocking drains or safety components. Use speed-adjusted volume at a low or medium setting. These steps can improve clarity, but no honest universal percentage applies to every Grand Cherokee.
Is wireless Apple CarPlay audio compressed?
Do not treat wireless CarPlay as ordinary Bluetooth audio; it uses Bluetooth and Wi-Fi as part of the connection. Apple specifically confirms lossless CarPlay playback through USB, but it does not make the same support statement for wireless CarPlay. Use USB when verified lossless Apple Music playback is the priority.
What are the best bass, midrange, and treble settings?
Start at 0/0/0. Many systems need no more than one step of correction in any band. Add a little bass only if it stays tight, add midrange for vocal clarity, and add treble only if detail is missing. Large boosts usually reduce clean headroom.
Can I set time alignment in the factory Uconnect menu?
Standard Uconnect 5 audio settings normally provide balance/fade, EQ, speed-adjusted volume, and surround when equipped, not manual speaker-distance entry. Time alignment requires a factory system that handles it internally or an aftermarket DSP or smart amplifier that exposes or automates the feature.
Should I leave surround sound on?
Tune with surround off first. Turn it on afterward and compare several tracks from the driver and passenger seats. Keep it on if it adds width without making vocals vague; leave it off if stereo imaging and vocal focus are cleaner.
Conclusion
The best Jeep Grand Cherokee audio settings are a clean starting point, not an extreme preset: flat EQ, centered balance and fade, modest speed-adjusted volume, and surround chosen by listening rather than habit. Verify the exact factory system before adding KICKER or Harmony components, match RMS power and impedance correctly, and set gain with measured test methods. The goal is clear, balanced sound at a comfortable level—not rattling panels, clipped amplifiers, or risky volume.







Leave a Reply